

Scharffen Berger Chocolate Chunk Bagels
The call to arms went out from @Scharffenberger via Twitter: @SeriousEats had just posted a homemade bagel recipe to their website, SeriousEats.com. Who would be willing to try making chocolate chunk bagels using Scharffen Berger's baking chunks?
My hand (and @ reply) went up faster than you can say gourmet chocolate. I was first introduced to Scharffen Berger at BlogHer Food in October of last year. Before that, I wasn't aware it existed. My life has improved markedly since that sunny day in San Francisco, if you hadn't guessed. Good chocolate can certainly be attributed to some of that. Scharffen Berger chocolate is beautiful, perfect, pure. It's my favorite chocolate to bake with, and its quality is worth every stinkin' penny.
I read through the Serious Eats post several times. I was nervous. I'm a Texan. What do I know about making bagels? Until I moved to the East Coast, I'd only ever eaten bagels from the grocery store. It didn't even occur to me I could make them at home.
People: stop what you're doing. Listen to me now. Not only can you make bagels at home, but it is easy.
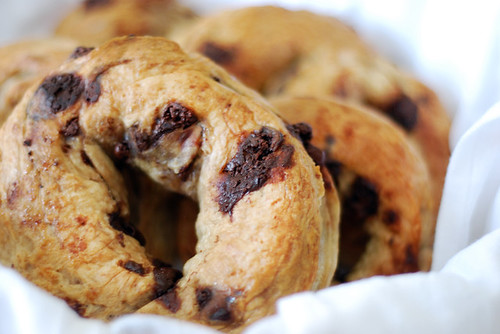
The dough comes together in minutes. After it's risen, simply make yourself an assembly line for the boiling process. Then it's a toss in the oven to finish. Minus the rising time, it takes 45 minutes to make bagels, from start to finish.
Imagine biting into a freshly baked, freshly toasted chocolate chunk bagel slathered in cream cheese or KerryGold Irish Butter next Sunday morning. It can be your reality. Really.
Scharffen Berger Chocolate Chunk Bagels
recipe adapted from Serious Eats
makes 10 bagels
Ingredients
3 ½ c. bread flour (I used King Arthur)
2 ½ tsp. instant dry yeast
3 tbsp. sugar (I upped the sugar quotient to match the chocolate. If you are making savory bagels instead, drop this to 2 tbsp.)
1 tsp. salt
6 oz. bag of Scharffen Berger 62% chocolate baking chunks
1 ½ c. hot water
1 ½ tbsp. barley malt syrup (I found this at a health food store. I'm told it's also at Whole Foods. Trader Joe's does not carry it. I asked.)
Directions
The SeriousEats website recommends making the dough in a food processor. But I didn't want the processor to break up my baking chunks, so instead, I used a standing mixer. You could probably use a hand mixer for this too.
Place the bread flour, yeast, sugar, and salt in a standing mixer bowl. Mix on a low speed until all dry ingredients are well combined and aerated.
Add the chocolate chunks and mix again until the chunks are well distributed. Leave the mixer running on low speed.
Run your tap water to the hottest it will go, and measure 1 ½ cups into a measuring jug with a pouring spout. Begin slowly pouring it into your mixer as it continues to mix. I found a steady, slow stream from the cup worked perfectly.
When the water had all been added, I found that there was a slight pocket of flour at the bottom of the bowl. I removed the bowl from the mixer and began working these "crumbs" into the dough. When it seemed like they wouldn't work into the dough anymore, I added another splash of water - no more than a teaspoon, and worked with my hands again until all the flour was incorporated.
Spray a large bowl with cooking spray and place dough ball in it. Cover tightly with plastic wrap and leave to rise for about an hour, until the dough ball has doubled in size. (I found taking a photo of the bowl with my smartphone to be advantageous. I could refer back to it after the hour and make sure the dough really had doubled in size.)
When the hour is up, begin boiling 4-6 quarts of water in a large soup pot. Add the barley malt syrup to the water at this time, and allow it all to come to a boil. Also preheat your oven to 400F.
Prepare a large baking sheet with parchment paper and set next to the stove.
Sprinkle a flat surface with a little more bread flour, and then turn out the dough on to it. Press the dough flat with your hands until it resembles a rough rectangle and you've pushed out some of the air.
Divide the dough into roughly ten equal pieces. I'm extremely bad at this part, and I did end up with some really big bagels and some really little bagels. It doesn't seem to have affected them in any way.
Roll each dough piece out into a long cylinder and then join the two ends over your hand or fingers. I found that you really need to squeeze and pinch the dough where you want it to join so that it doesn't come apart in the boiling stage.
When all 10 bagels have been rolled and joined, cover them with plastic wrap again (I reused what was on my bowl) and allow to rise for 10 more minutes.
Prepare an area next to your stove with a stack of clean paper towels. Also, find a slotted spoon or spatula. I used a flat metal spatula, and it worked perfectly for the next part.
The pot of water should be at a rolling boil now. Pick up one bagel with your flat metal spatula and place it in the water. You will allow the bagel to boil for 30 seconds on each side. The SeriousEats post said you could boil up to 3 at a time, but I found it easier to do one at a time. I set my oven timer to one minute just before dropping the bagel in the water, hitting start with one hand while placing the bagel with the other. At 30 seconds, use the spatula to flip the bagel over in the water.
When 1 minute has passed, remove the bagel with the slotted spatula to the clean stack of paper towels. Pat the bagel dry of excess water, and then flip onto the baking tray from the paper towel. Your paper towel will become covered in bits of melting chocolate as each bagel is dried. I simply started with a fresh paper towel on top of the old ones when the first one became too sullied.
Continue with this process until you have boiled all 10 bagels. Now place the baking tray into the oven.
Bake for 15 minutes. Using the same metal spatula, flip the bagels after the 15 minute mark, and allow to cook for 10 minutes more.
Allow to cool, and then dig in! I spread a bit of cream cheese sweetened with brown sugar onto my bagel, and it was sheer perfection.
[wpurp-searchable-recipe]Scharffen Berger Chocolate Chunk Bagels - - - [/wpurp-searchable-recipe]
These look just spectacular! Glad they turned out well for you... I'm feeling inspired to make some bagels now!
Beautiful bagels! And, yes, I agree. Using a good quality chocolate makes such a difference.
I just stumbled upon your blog and I'm so glad I did. I've never made homemade bagels before and now I'm inspired, specially because of the chocolate part.
I have some of those chunks in my pantry. Guess what I wanna make with them now? 🙂
These turned out so beautifully, Amber! Amazing job!!!
I've thought about making homemade bagels several times. The more I read, the more I'm convinced to do it!
These sound AMAZING - I have never made bagels with chocolate chunks before and now I totally need to try it. And, these bagels sound so easy! I'll have to give this recipe a try and compare it to the ones I usually make. You know, for research purposes. 😉
YUM!!
I have a good friend who went to culinary school and after a lot of nagging, she had me over to teach me to make bagels.
It WAS easy!! And they were so yummy too!! Adding chocolate sounds like the perfect touch.
Those bagels plus some good butter, heaven!
Oh. My. Goodness. These look stellar, Amber. I had no idea the barley malt syrup was for the water. Love this recipe.
Wow! I'm completely impressed! I consider myself a good baker who will take on challenges...and I took on making bagels years ago, supposedly with all the professional ingredients...I was disappointed and have not attempted since.
Your tutorial is fabulous...it's the special hints that one takes time to give to which cooks should really pay attention. I try to give a little extra advice from my experiences on my posts...and I worry that I might be giving too much. After reading your wonderful post and some other really good tutorials, I think I'm going to stop worrying about this.
I wonder how the barley malt syrup helps the recipe...I can't remember if the recipe I used called for this.
My friend at Eating Bangkok will really appreciate this recipe, as he posted a great article on the history of bagels not long ago...and he mentioned that he would miss his bagels when he moved to Bangkok. That move will be coming up within the next couple of months. I challenged him to learn to bake bagels before he went, and he accepted the challenge.
I will retweet your wonderful post to him. Thanks!
How fun! I saw you @reply on twitter but I never expected a recipe so soon! You got to work fast!! 🙂
These turned out beautifully, Amber! Love them.
Holy cow, those are awesome!! I am rising to the challenge girl.
Amazing! I will definitely be trying these. xoxo.